My Blog has Moved

I've moved my blog to BeingGenevieve.com


Check it out to see my latest projects and recipes.

Tuesday, February 21, 2012

Visiting Teaching (Oatmeal Chocolate Chip) Cookies

Come check out my new blog at BeingGenevieve.com


When Kevin and I were first married I had a wonderful visiting teacher for only 1 month. Her name was Emily and was very sweet. She brought these cookies to me; Kevin and I instantly feel in love with these and she willingly passed on the recipe. Now I am passing it on to you.


Ingredients:
1 C - Butter
1 C - Sugar
1 C - Brown Sugar
1 tsp - Vanilla
2 Eggs
1 tsp - Baking Powder
1 tsp - Baking Soda
1/2 tsp - Salt
3.5 C - Old Fashioned Oats
2 C - Flour
1 C - Milk Chocolate Chips
1 C - Semi-Sweet Chocolate Chips

Cream butter and sugars. Then add eggs and the vanilla; mix well. Put baking soda, baking powder, and salt into the batter and mix. Add the oats; mix. Put the flour and chocolate chips in last. 

Fill your cookie scoop so it is heaping slightly. 
Place on parchment paper, silicone mat, or a greased cookie sheet.

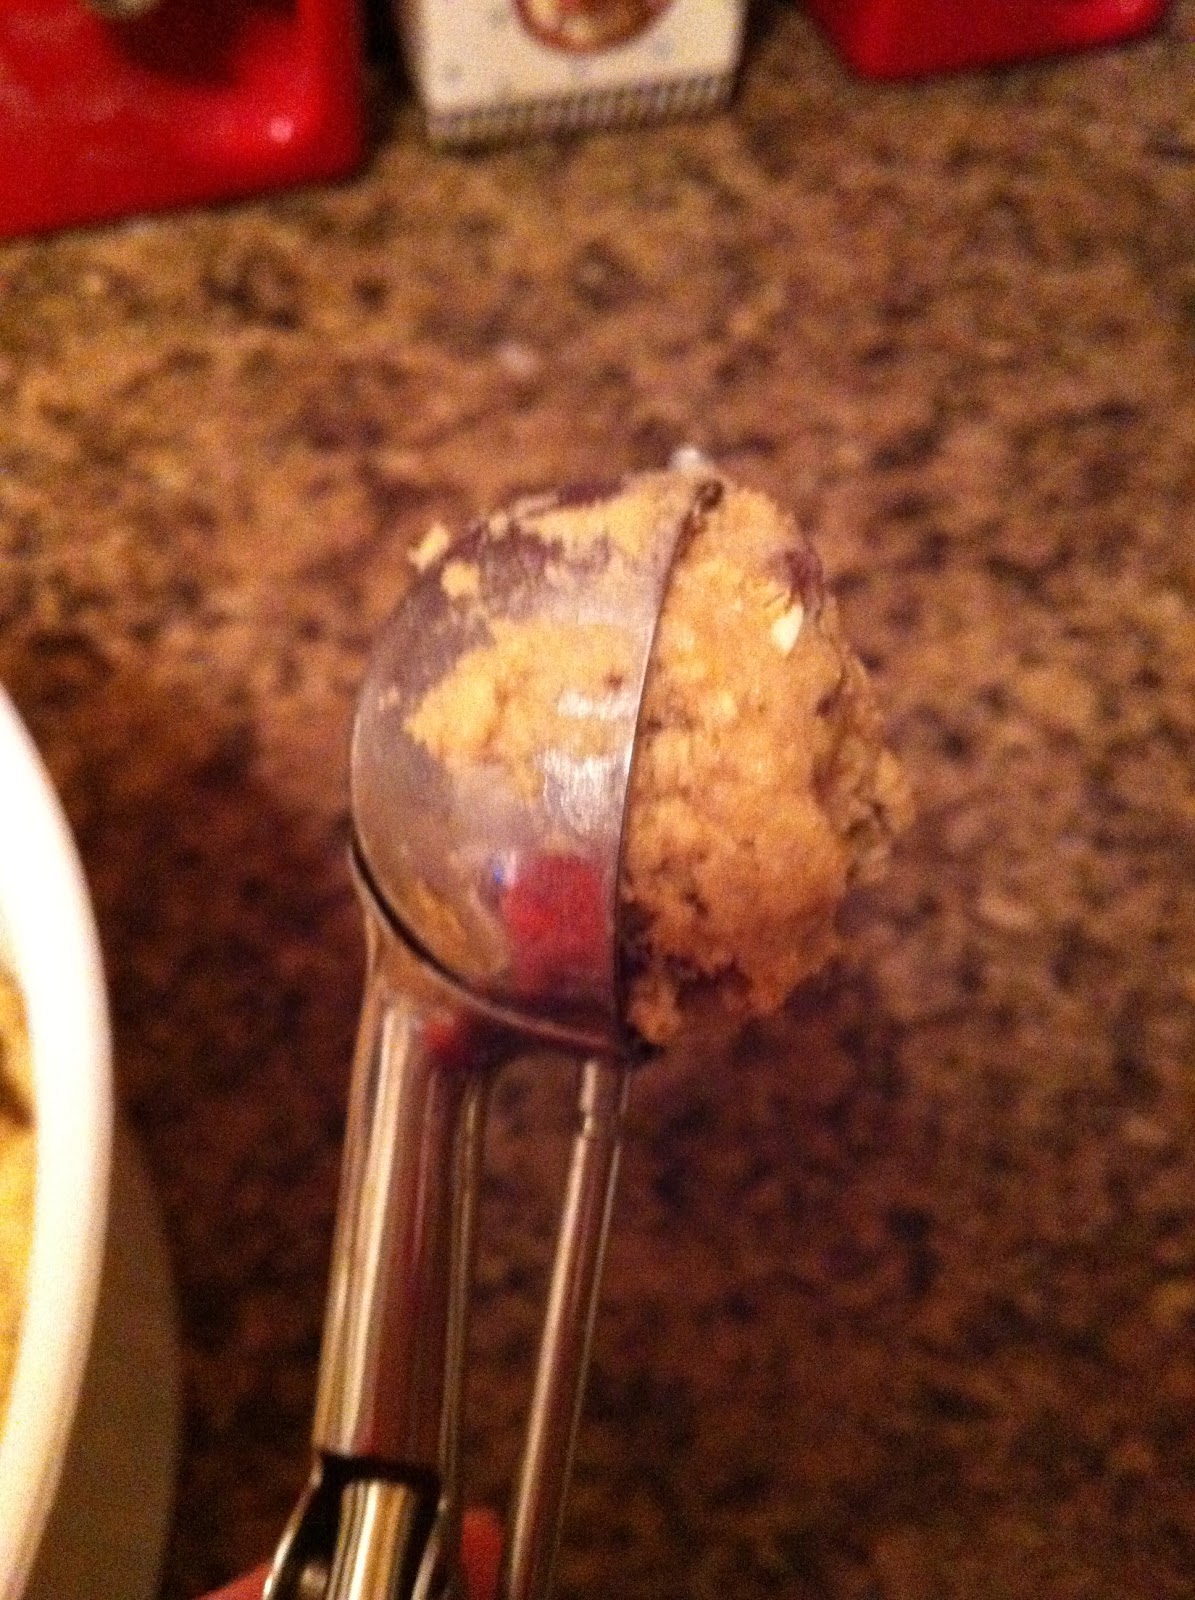
Use your two fingers and push down the top of the cookies ever so slightly.

Bake at 350 degrees for 10-15 minutes (my oven is exactly 12 minutes). It took me a little practice on what to look for to know if they were done. You can't go off of color or else they are way over done. 

I pull mine out when they are a little undercooked in the center and let them sit on the cookie sheet for 3 minutes.

Then place them on a cooling rack.
Makes about 5 dozen
We only cook about 12-24 cookies and then I make cookie dough logs out of the rest. Wrap the logs in saran wrap and put in the fridge or freezer. They freeze PERFECTLY!
 
When you want more cookies just pull out of the fridge/freezer and cut off about 1/3 of an inch. No need to defrost them at all. Just throw them in the oven and enjoy!

Come check out my new blog at BeingGenevieve.com

Monday, February 20, 2012

Bath & Body Works Foaming Soap

Come check out my new blog at BeingGenevieve.com


I just love my Bath and Body Works foaming antibacterial hand soap, but I don't love the price. 

Want to know how to re-create this soap for less than 50 cents?

Begin by collecting all your empty bath and body works foam containers. Then buying some Softsoap soap at Wal-mart for 98 cents. There are alot of scents so have fun with it.

 Pour about 1 inch of soap into your foaming container and fill up the rest of the container with warm water (leave about 1 and 1/2 inches at the top so the lid will go on with out over flowing).

Put the lid on and GENTLY tilt the container back and forth so the soap incorporates with the water.  
Do not shake or you will have a foaming nightmare.

Now you have wonderful Bath and Body Works, look a like, soap for a fraction of the cost! 
Your guests will never even guess that you only spent about 30 cents on your container of soap.

Come check out my new blog at BeingGenevieve.com

Wednesday, February 15, 2012

Seven Dollar Dress

Come check out my new blog at BeingGenevieve.com


With those Joann's coupons anything is possible. I made a new church dress for only seven dollars!

+1 yard of fabric ($4)
+1 yard 2'' belt elastic ($3)
$7.00
It looks just like a shirt tucked in a skirt, but the best part of this is no more running into the restroom to tuck in your shirt every time you bend over.
No I didn't come up with this myself (I would love to claim it though). This is where the idea originated (Elle Apparel), but this is the place I first stumbled across it (Mommy by day... Crafter by night).

I did notice that neither tutorial tells you the proper way to hem a dress/skirt.  
In this tutorial, I will just pick up on where they left off.

Follow Elle Apparel's and Mommy by day's tutorials on how to put together the dress.  
I will just be showing how to hem.

Begin by trying on your dress/skirt and mark with a pin where you want the final length to be.
Take off dress and lay it on the ironing board.

I measure the distance from the pin to the bottom of the skirt with my seam gauge.
 I then mark a line with my Mark-B-Gone pen at that location and work my way around the entire skirt (about 1 inch apart from each other).

Now measure 1.25 inches down from the line that you just made. (This will be where you will be cutting off.) Do this around the entire skirt just as you did in the step above.

Begin cutting along the line that you just made.

Iron the bottom of the skirt up 1/4'' all the way around.

Now iron the bottom up 1'' or to the first line that you marked on the skirt.


Find on your sewing machine the hem stitch that looks like mine (#7).
Fold back the fabric like I did and begin stitching with your hem stitch.

Align your presser foot so that the fabric, to the left of the fold, barely gets caught by the needle.

This is how the stitch should look when finished.
You can see that the zig-zag just barely caught the fabric.

The front of the skirt will look like this. 
You can see the stitching close up, but when it is on you can't see it.  
This hidden hem helps the bottom of a skirt/dress lay and hang very nicely.

Mist the bottom of the skirt where all the little blue marks are and they will magically disappear.

You are ready to begin enjoying your seven dollar skirt/dress.

Tuesday, February 14, 2012

French Bread

Come check out my new blog at BeingGenevieve.com


I have a new favorite thing to take to friends around the neighborhood; Homemade French Bread! The recipe makes 2 loaves so you can have one to share and one for your family.

All you do is make the bread and take out some homemade freezer jam from the freezer and presto you now have a new friend. 

It may look and sound intimidating, but it is one of the easiest things you can make.
 Ingredients:
3 C  - Hot Tap Water 
2 T - Instant Dry Yeast
2 T - Oil
2 T - Sugar
1 T - Salt
8 C - Flour

 Throw all the ingredients, all at once, in a mixer and mix until just combined.  
*This recipe does very well halved; all the pictures are with a half-recipe. A full-recipe would just make bigger loaves.

Knead the dough for 8-10 minutes in a mixer or by hand.
Split the dough in half and put one half aside.

Roll the dough out in a rectangle, about the length of a cookie sheet. Then, roll up the dough just as you would cinnamon rolls. This helps get all the bubbles out of the dough.

Pinch the dough at the seams.

Lift the ends and pinch it together, bringing it to the underside of the dough.
 
Place the loaf on a silicone mat, parchment paper, or just a greased cookie sheet with the seam side down. Take the other half of the dough and do the same as the first. (Roll out, roll up, and pinch together.)

Cover the pan with a towel
Perfect Rising Environment: Pre-heat over to 400 degrees for ONLY 2 MINUTES. Then turn off the oven. 

Put the pan in the warmed oven and have it rise for 45 minutes. 

Take pan out after 45 minutes and then pre-heat oven to 400 degrees. 
 
Score the bread with a sharp knife. (Score whatever pattern you like.)
Cook bread (15-20 minutes for half recipe; 20-25 minutes full recipe).

When you have 7 minutes left on your timer, take out bread and brush with salted butter. 
(Olive oil doesn't work as well as the butter.) 

I use 1 tablespoon of melted butter for a half-recipe and 1.5 tablespoons for a full-recipe.

Place back in the oven and cook the remaining 7 minutes. 
When the loaves are done I immediately place them on a cooling rack.

Time to wrap one loaf up in a towel and run it next door. Enjoy!

Come check out my new blog at BeingGenevieve.com


Tuesday, February 7, 2012

Dust-Collecting Shirt

Come check out my new blog at BeingGenevieve.com


So if you are anything like me you have several shirts in the closet, that were super cheap, that you thought weren't that bad when you bought them, but after one wearing you realized you were wrong. Now, they are just collecting dust.
Before


After

Here is a frumpy, low-cut shirt I bought at Old Navy several years ago that was like $5, but I wore once and realized it wasn't right for me.

Here's what to do . . . 
(this is my first tutorial so I forgot to take pictures of all the steps, sorry)


I began by putting my shirt on inside out and pinning the shoulders up to where I wanted it; to get rid of the low-cut neckline. I also placed a pin on the arm where I wanted the sleeve length to end up.

Take off the shirt carefully and fix the pins so they are equal distances down from the original shoulder seam on both sides on the shoulders. 

Take a mark-be-gone pen and draw a line tapering down to where your finished sleeve will be. Sew directly on that line.

Put your shirt back on and make sure the shoulders and neckline ended up where you wanted them.
Also, pull the sides and pin to how snugly you want the shirt to fit (forgot to take picture).

Pin the sides of your shirt (equally brought in on both sides), mark and sew just as you did for the shoulders.
Remember to try the shirt on again to make sure the shirt fits correctly.
Now cut all your seams (shoulders/sleeves and sides) to 1/4'' and serger or zig-zag seams.

Take your shirt mark where you want your finished sleeve to fit and then mark 3'' below that. Now cut along both lines. Don't worry about leaving length for sleeve allowances because you will be adding a band. 
Don't look at my lines, I kept changing where I wanted it and how much of a band I wanted.
Now take the sleeve finished length divided by 2 and cut a piece of very skinny elastic. (My sleeve was 8'' so I cut a piece of elastic at 4'').

Now sew the elastic to the sleeve, starting at the top of the sleeve and ended at the very bottom of the sleeve. Stretch/pull the elastic as you sew; don't stretch the sleeve fabric at all.

Try the shirt on and draw a line so you know how much to bring the under part of the sleeve up. Take off and cut. Doesn't need to be perfect, you are adding a band to it.

Now for the sleeve band . . .
This is probably going to be a little confusing without pictures, but I will try my best.

Take that 3'' tube like piece you cut from the sleeve and fold it in half with wrong-sides together (or seams on the inside). Now you have a much thinner tube piece. 

Pin and sew it to the sleeve with a 1/4'' seam. Serger or zig-zag seams to finish them so they won't fray.  

Now top stitch on the sleeve just above the seam where the band and sleeve come together.

Now shake/wash off all the remaining closet dust and put on your fabulously new re-fashioned shirt.

Come check out my new blog at BeingGenevieve.com